Live KVM migration with virt-manager
With the new servers and my server room shaping up, I’ve been working on setting up ALL THE THINGS! I just managed to set up live migration of the KVM virtual machines I use for testing my FLOSS projects. Here is a short writeup of that, just as a reminder for myself.
Checklist
- Make sure the libvirt versions are the same. I tried setting up migration between CentOS 7.2 and and Ubuntu LTS 16.04 which turned out to be a mess of insurmountable incompatibilities. I’ve now gone back to run Ubuntu on everything and it all works fine.
- Set up NFS for the backend store of
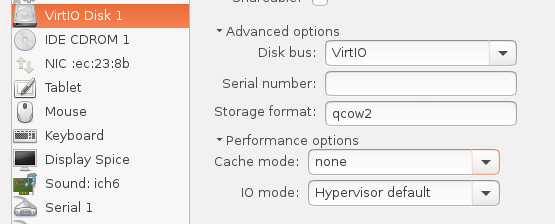
/var/lib/libvirt/images. Make sure to export the share properly, I tried first with my ReadyNAS, but couldn’t set up root access (defaulted to nobody). - Set up VM disk caching=none
- Set up VM processor model=default
- Profit
Good Luck! :)
Setting up NFS
This is probably the easiest file sharing protocol to set up in UNIX. On Ubuntu and Debian GNU/Linux you need to install the NFS packages first:
apt install nfs-common
Then simply list the directory and permissions in /etc/exports on the
server and run exportfs -a:
/var/lib/libvirt/images *(rw,sync,no_root_squash)
Yhen mount it on the client with:
mount -t nfs server:/var/lib/libvirt/images/ /var/lib/libvirt/images/
For a more permanant setup, add the mount point to /etc/fstab and run
mount -a:
server:/var/lib/libvirt/images/ /var/lib/libvirt/images/ nfs defaults 0 0
To speed things up a bit you can install the nfs-kernel-server package
on the server.
To see what shares a server has, use showmount -e server – useful for
debugging. Usually I forget running exportfs on the server.
Setting up virt-manager
In principle not much needs to be changed on the system you want to migrate from, only a few things need tweaking and libvirt will give you warnings along the way.
First, make sure to change caching settings of the VM’s backing store. It is located in the Details view:
IDE Disk 1 --> Advanced --> Performance --> Cache mode: none

Second, set CPU model to Hypervisor default:
CPUs --> Configuration --> Model: Hypervisor Default

Profit!
That’s it, now live migration from your laptop to the server should work.